|   Home   |   The Studio    |   Studio Stories    |   Pilates Press    |   Health & Wellness    |   Nutrition   |

Monday, 9 February 2015

PANKO CHICKEN NUGGETS


I love to make recipes that contain no added oil. It just makes me feel so much healthier. I decided not to fry these chicken nuggets prior to baking them in the oven for this very reason. If gluten intolerant, polenta or gluten-free breadcrumbs would work nicely as a substitute for panko. I like adding ground paprika and chives, however you could change the seasonings and add ground chilli, lemon pepper seasoning, dried oregano, fresh coriander, the possibilities are endless. 


Ingredients

  • 500g chicken breast fillets, fat removed 
  • 1 free range egg, beaten
  • 1 1/2 cups panko breadcrumbs
  • 1 teaspoon ground paprika
  • 2 tablespoons finely chopped fresh chives


Cooking 

1. Preheat a fan force oven to 180 degrees celsius. 

2. Cut the chicken into small, even sized nuggets/pieces. 

3. . Whisk the beaten egg with 3 tablespoons water in a small bowl and place at the start of your assembly line, after the chicken pieces. Combine the breadcrumbs, paprika, chives and pinch of salt & pepper (optional) in a medium bowl and place this next to the egg. Place a baking tray lined with baking paper at the end of the assemble line. 

4. The fun part - making the nuggets! Dunk each piece of chicken into the egg, then let the extra egg drip for a second off the chicken before placing the chicken piece in the panko seasoning bowl. Cover the nugget with the breadcrumbs by turning it over on each side and then place on the baking tray. Continue this process until no chicken remains. 

4. Bake the chicken nuggets in the oven for 15 minutes or until just lightly brown. Remove from the oven and leave the chicken to cool and continue cooking for 5 minutes before serving. 

Serves / 4 with a side dish 
Total Preparation time / 15 minutes 
Total Cooking time / 20 minutes 


x Emily 

Monday, 10 November 2014

EM'S FAVOURITE GREEN SMOOTHIE


I love this smoothie and make it most days for myself and Chris. I often use frozen mango (when fresh mango is not in season) however I recently substituted this for pineapple which tastes just as nice. I like buying bananas in bulk, removing their skin and glad -wrapping them individually to use for smoothies, ice cream and other sweet treats. I use Hawaiian Coconut Energy sachets as it contains no sugar, is extremely low in calories and is full of calcium, minerals, potassium and electrotyles. You can buy this coconut water at Premium Pilates Studio or at alohahealth.com.au

Ingredients

  • a large handful of washing baby or english spinach 
  • 2cm knob of fresh ginger, grated 
  • 1 stalk of celery, washed & chopped
  • 1 kiwi fruit, skin removed 
  • 1 mango, cut into small pieces or a handful of pineapple pieces
  • 1 frozen banana
  • 250ml no sugar coconut water 

Method

1. Combine all the ingredients into a blender and blend for a minute or until combined. Add more water if you want a thinner consistency. 

Serves / 2 


from the PPS team 

Monday, 15 September 2014

BROWN RICE VEGETABLE LOAF with PUMPKIN MASH


This is one of my favourite recipes in the entire Michelle Bridges program and has got a great response from my Food blog (soulful sandwiches.blogspot.com). It is wholesome, filling and packed to the brim with goodness. I love pumpkin and broccoli together and here is no exception. I have altered the recipe slightly by adding and changing a few ingredients. Just a splash of almond milk will do to bring out the sweetness of the pumpkin in the mash. I have added garlic and removed ginger as I am a sucker for garlic and soy sauce together. The extra egg on top of the brown rice assists in helping the loaf to hold its shape (which it does extremely well). Definitely a recipe I will make again and again and many more times after that.  

Ingredients

  • 3/4 cup brown rice (150g)
  • 1 head of broccoli (around 150g) cut into florets and stalk roughly chopped
  • 1 large garlic clove, finely chopped
  • 3 teaspoons soy sauce
  • 2 free-range eggs, lightly beaten
  • 300g pumpkin, peeled, deseeded and cut into 2cm pieces
  • 1 tablespoon unsweetened almond milk
  • 30g baby spinach 
  • 60g avocado, scooped into small pieces

Cooking 

1. Place the rice and 2 cups of water (500ml) in a medium saucepan and bring to the boil, covered. Once boiled reduce to a simmer and cook, covered, for 25 minutes or until the rice is absorbed. Add the broccoli florets on top of the rice for the last 5 minutes of cooking. Remove from heat. 

2. Whilst the rice is cooking, grease a loaf tin (with a base of approx. 20cm x 10cm) with oil and line the base and sides with baking paper. Once the rice is almost cooked preheat a fan-force oven to 180 degrees celsius. 

3. Remove the broccoli from the rice and finely chop. Transfer the rice to a large bowl to cool. 

4. Combine the broccoli, garlic, 2 teaspoons of the soy sauce, 1 egg and ground black pepper with the rice, stirring well. Spoon the mixture into the prepared tin, smoothing the surface with a wet tablespoon. Pour the other egg on top and bake in the oven for 25-30 minutes or until the top is just golden. Remove from the oven and let stand for a minimum of 5 minutes to cool. 

5. Whilst the loaf is cooking, bring the pumpkin pieces and enough water to cover them to boil over high heat. Continue cooking for 5 minutes or until the pumpkin is tender. Remove from the stove, drain the pumpkin and mash until smooth, adding the almond milk as you mash. 

6. Toss the baby spinach, avocado and 1/2 teaspoon soy sauce in a small bowl as a side salad. 

7. Once the rice loaf has cooled slightly, carefully remove it from the tin and cut into 4 slices. Drizzle the 1/2 teaspoon soy sauce remaining over the top of the loaf. Serve 2 slices of brown rice loaf with half of the pumpkin mash and half of the salad. 

Serves / 2 
Total Preparation time / 10 minutes 
Total Cooking time / 65 minutes 
Approx. calories / 515 per serve

x Emily 

Thursday, 14 August 2014

95 CALORIE ANZAC BISCUITS (POST ANZAC DAY)


Who doesn’t love a good anzac biscuit? Especially one that you can eat without feeling guilty whilst following a healthy eating plan! These anzac biscuits are super cute and very moreish. Be mindful that they are 95 calories each, so only 1 per day as a treat. 


After giving away all of my Mini Cacao Fudge Treats that I made last week, I decided that it was time for another treat. Michelle Bridges recipe for these biscuits calls for ¼ cup brown sugar, however if you use granulated stevia you save a massive amount of calories overall. I always like to bake with gluten-free flours, however you can use plain flour if it is more accessible to you as it contains the same amount of calories. I added more cinnamon than Michelle, as I love this spice and like to really taste it in desserts. I replaced golden syrup with honey as honey is slightly lighter in calories and I am not a big fan of golden syrup, even though theres a very neglected bottle of it in my pantry that desparetly needs to be used! No doubt I'll be sharing these bad boys around so I can clear my kitchen of sweets and be able to make another treat recipe next week! 

Ingredients
•   1 1/2 cups rolled oats (150g)
•   1/2 cup gluten-free plain flour, plus extra (75g)
•   1/2 cup desiccated coconut (45g)
•   2 teaspoons ground cinnamon (8g)
•   1/4 cup granulated stevia 
•   1/4 cup honey (85g)
•   1/4 cup olive oil / rice bran oil (60g)
•   1 teaspoon bicarb of soda (5g)

Baking  

1. Preheat a fan forced oven to 180 degrees celsius. Line a large baking tray with baking paper. 

2. Combine the oats, flour, coconut, cinnamon and stevia in a large bowl and stir well. 

3. Pour the honey, oil and 1/4 cup water (60g) into a small saucepan and heat over low-medium heat, stirring until all ingredients are mixed. Stir in the bicarb of soda and once the mixture has foamed, remove from heat. 

4. Pour the wet ingredients into the dry ingredients bowl and stir until well combined. To shape the biscuits, make sure your hands are slightly wet (you will need to re-lubricate your hands a few times).   Roll heaped tablespoons of the mixture and place on the prepared tray 2cm apart. Press each ball lightly with a fork covered in flour, just to flatten the biscuits slightly. 

5. Bake in the oven for 10-12 minutes, or until biscuits are golden brown. Remove from the oven and leave to cool completely on the tray (during this cooling time the biscuits will harden slightly, so do not worry if they are a little soft when you remove the tray from the oven). 

Makes  / 20 
Each biscuit / 95 calories
Total Preparation time / 20 minutes 
Total Baking time / 10-12 minutes 


x Emily 

Saturday, 2 August 2014

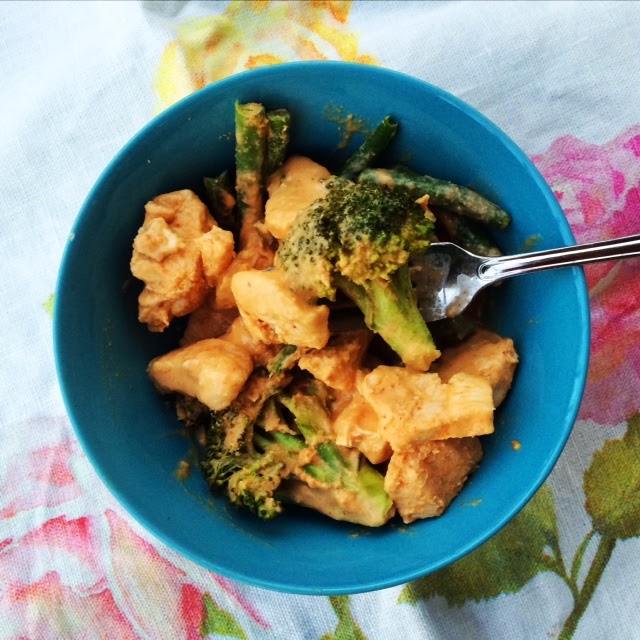
HEALTHY PENANG CHICKEN CURRY


This week Chris & myself embarked on the Michelle Bridges 12 Week Challenge. Whilst we are very health conscious, we recently noticed that our portion sizes have become bigger and bigger during winter. We wanted to get a handle on this quickly! Due to the fact that we own a Pilates studio healthy eating has organically become a part of our lives, however we just felt a need to fine-tune our eating habits. Hence this is the start of several recipes straight from (and adapted) the Michelle Bridges Transformation. To see the whole collection of recipes that I test out over the coming weeks and months you will need to go to soulfulsandwiches.blogspot.com. Premiumpilatesstudio.blogspot.com will feature one weekly recipe and a snapshot of Chris and my improved eating. We hope you follow us on this journey. Remember that weight loss is 10-20% exercise and 80-90% what you eat!!

First up is a Penang Chicken Curry. If you are not a meat eater, substitute the 1500g of chicken for 1150g firm tofu and cook the same way. The recipe calls for 1/3 brown sugar, however I do not think this is a necessity for this curry and by removing this ingredient you save 30 calories a serve (yay!). The name of this curry refers to the island of Penang in Northen Malaysia. Whilst this healthy version tastes creamy and delicious, I am sure the authentic Penang curry tastes quite different! Remember that this recipe feeds six, so divide it into six even serves and refrigerate the remaining serves so that you are not tempted to eat more! 


Ingredients

  • 2 heaped tablespoons red curry paste 
  • 1500g / 1.5kg free range chicken breast, cut into even strips OR 1150 / 1.150kg firm tofu, cut into even pieces
  • 1 x 400g tin light coconut milk
  • 1 tablespoon fish sauce
  • 1/3 cup organic peanut butter
  • 1 head of broccoli, cut into even-sized florets and stalk chopped
  • 200g green beans, trimmed 

Cooking 

1. Heat a large, deep frying pan over medium heat. Add the curry paste to the pan and cook, stirring constantly, until the paste is spread across the bottom of the pan. 

2. Add the coconut milk and cook, stirring for 2 minutes. Make sure that the liquid does not boil by continually stirring and keeping the heat at a medium range. 

3. Pour in the fish sauce and peanut butter and stir until the mixture is smooth and not lumpy. Reduce the heat to low and simmer for 5 minutes or until the chicken is just cooked and tender. Make sure to keep the heat from the stove low so that the sauce does not boil, as it will separate. 

4. After step 1, bring a saucepan of water to the boil and cook the greens (broccoli & beans) in a steamer over the water. Cook for a few minutes until the greens are just tender and not soggy. 

5. Divide the chicken, sauce and vegetables into six equal serves. 

Serves / 6 
Total Preparation time / 20- 25 minutes 
Total Cooking time / 10 minutes 
Calories / 464

x Emily 

Saturday, 19 July 2014

STUFFED TANGY QUINOA CAPSICUMS


I’ve made stuffed capsicums on several occasions over the years, mostly with couscous or rice as the foundation. I have ample amounts of quinoa in my pantry after buying up big at Costco (2kgs to be exact) hence this ingredient was chosen as the filler. Depending on how hungry you are, you can add some grilled chicken and/or lentils to the capsicums for more protein. I love the tanginess of the lemon, sumac spice and tomato as a topping. A sprinkle of whatever chopped/crumbed cheese you have on hand and finely chopped garlic will provide the quinoa with some added flavour. I love eating these capsicums as a light dinner. I do slightly prefer green capsicums over read for this recipe, however red always seems to be in much greater supply as my green grocer! 

Ingredients

  • 3/4 cups quinoa (any sort will do)
  • 3 medium red / green / or a mixture of the two capsicum, deseeded & membranes removed and cut in half 
  • 1 tablespoon coconut oil
  • 1 large garlic clove, finely chopped
  • 20-30g goat's feta cheese, crumbled
  • 1 large tomato, roughly chopped
  • 1 heaped teaspoon sumac
  • the juice of 1/2 a lemon
  • 1/3 cup finely chopped fresh herbs (i.e parsley, basil, chives)

Cooking 

1. Preheat a fan-force oven to 200 degrees celsius. Line a large baking tray with baking paper. 

2. Rinse the quinoa twice in cold water, then strain well. Pour the quinoa into a small saucepan and add 1/2 cups water with a generous pinch of sea salt. Cover the pan and bring to the boil, then simmer for 10-12 minutes or until all water is absorbed and the quinoa is cooked (taste to check). 

3. While the quinoa is cooking, heat the coconut oil in a medium to large frypan over medium-high heat. Add the halved capsicums and cook on their round sizes for 5-6 minutes or until lightly scorched. Remove from the heat and place cut side up on the prepared baking tray. 

4. Once the quinoa is cooked, combine with the garlic and goat's cheese and spoon the mixture into the hollow part of the capsicums. Bake in the oven for 15 minutes, then remove. 

5. Whilst the capsicums are in the oven, combine the tomato, sumac, lemon, fresh herbs and a pinch of sea salt. Once the capsicums have finished baking, top them with this tomato mixture and serve warm. 

Serves / 2 hungry people
Total Preparation time / 10 minutes 
Total Cooking time / 35 minutes maximum 

x Emily 

Wednesday, 2 July 2014

TERESA CUTTER'S PUMPKIN BREAD


I stumbled across this recipe by the Healthy Chef, Teresa Cutter, while looking in a House & Garden magazine for renovation inspiration. I’ve come across Teresa in the past and have tried out some of her gluten-free, often dairy-free and health-conscious desserts and treats. I am sure we are all guilty of thinking of allergy free and low sugar sweets as dry, bland and uninteresting at one point in time, but the Healthy Chef blows this falsehood out of the water with her full flavoured, moist and easy-to-make cakes, muffins and breads (among other recipes). Here is her Pumpkin Bread, adapted very slightly. Even if you are not a fan of pumpkin I suggest making it- the warm bread is delightful with a dollop of butter, dunked in a steaming bowl of soup or eaten solo. 

INGREDIENTS
  • 3 heaped cups (450-475g) grated raw pumpkin 
  • 1 tablespoon maple syrup
  • 4 eggs, preferably free-range 
  • 1/4 teaspoon sea salt
  • 1/4 teaspoon ground nutmeg 
  • 1/6 - 1/4 cup olive oil 
  • 3 cups almond meal
  • 2 tablespoons gluten-free baking powder, sifted 

COOKING / BAKING

1. Preheat a fan-forced oven to 180 degrees celsius. Line a narrow but deep loaf tin with baking paper. 

2. In a large bowl place the grated pumpkin, syrup, eggs, salt, nutmeg and oil. Mix to combine and add almond meal and baking powder, stirring well. 

3. Pour/spoon the pumpkin mixture into the prepared tin and bake for 1 hour or until a skewer or knife inserted into the centre of the bread comes out clean. Remove from the oven and allow the bread to rest for 1 hour before lifting out. 

Makes / 1 loaf
Total Preparation time / 15 minutes
Total Cooking time / 1 hour 10 minutes 

x Emily